BootCamp Assistant feature allows Mac users to easily dual-boot between a Mac and Windows partition. Having dual booting multiple operating systems is very useful especially when you want to run many operating systems on the same machine.
But, if you don’t want to run Windows on Mac anymore then removing the Windows OS and reclaiming the hard drive spaces should be your mission.
Though, Mac users prefer to format their Apple hard drive and then restore the OS X through a recent Time Machine backup. But, it is not always necessary, and you can preserve your Mac OS X by removing the additional Windows BootCamp partition.
Note: Before you begin, try to make sure that you have proper hard drive backup available on your Time Machine. It makes it easy to recover the data in the unusual event if something goes terrible wrong with Mac. It is also important to remember, that this will not only remove the Windows installation but all the applications or files that are already stored on the Windows partition.
Now when Time Machine has completed the OS back, you can easily proceed to delete the BootCamp partition running Windows 7 or any of its latest version. The best part: your OS X partition will remain intact.
Steps to Remove a Windows BootCamp Partition
1.Reboot your Mac, do this by holding the Option button and then select ‘Mac HD', which is your startup disk. Note: Remember, removing BootCamp partition through the Windows OS isn’t possible
2.In 2nd step, Open the ‘BootCamp Assistant’ appliation, which can easily found in the /Application/Utilities/ folder of your Mac based hard drive
3.In 3rd step, clicking on ‘Continue’ button and then check the box for “Install or remove Windows 7” or later version

4.In 4th step, select ‘Restore disk to a single Mac OS X partition’ and then click on ‘Continue’ button again to proceed further
5.Here, you need to confirm the changes at the ‘Restore Disk’ screen and select the ‘Restore’ button to complete the BootCamp removal process
6.Once done, close the BootCamp Assistant application
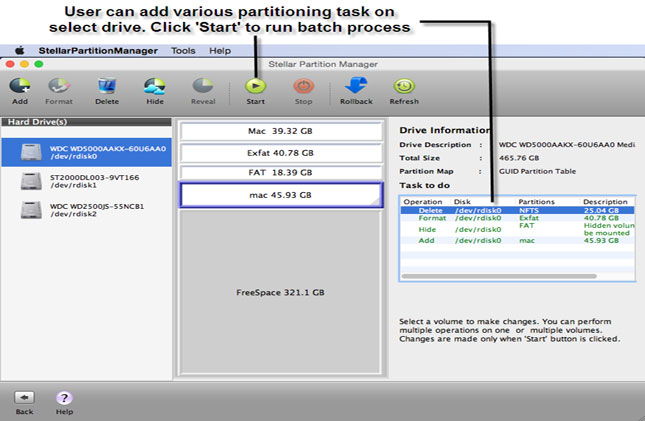
Note: Disk Utility will not resize the available partition spaces to OS X Mac, hence you will need to use a third-party Mac partition manager.
The steps mentioned above are the must and to-do steps while removing the Windows partition and also repartitioning the Mac. All the mentioned steps are much similar to the steps performed which you can do from Disk Utility.
But, if you don’t want to run Windows on Mac anymore then removing the Windows OS and reclaiming the hard drive spaces should be your mission.
Though, Mac users prefer to format their Apple hard drive and then restore the OS X through a recent Time Machine backup. But, it is not always necessary, and you can preserve your Mac OS X by removing the additional Windows BootCamp partition.
Note: Before you begin, try to make sure that you have proper hard drive backup available on your Time Machine. It makes it easy to recover the data in the unusual event if something goes terrible wrong with Mac. It is also important to remember, that this will not only remove the Windows installation but all the applications or files that are already stored on the Windows partition.
Now when Time Machine has completed the OS back, you can easily proceed to delete the BootCamp partition running Windows 7 or any of its latest version. The best part: your OS X partition will remain intact.
Steps to Remove a Windows BootCamp Partition
1.Reboot your Mac, do this by holding the Option button and then select ‘Mac HD', which is your startup disk. Note: Remember, removing BootCamp partition through the Windows OS isn’t possible
2.In 2nd step, Open the ‘BootCamp Assistant’ appliation, which can easily found in the /Application/Utilities/ folder of your Mac based hard drive
3.In 3rd step, clicking on ‘Continue’ button and then check the box for “Install or remove Windows 7” or later version

4.In 4th step, select ‘Restore disk to a single Mac OS X partition’ and then click on ‘Continue’ button again to proceed further
5.Here, you need to confirm the changes at the ‘Restore Disk’ screen and select the ‘Restore’ button to complete the BootCamp removal process
6.Once done, close the BootCamp Assistant application
Note: Disk Utility will not resize the available partition spaces to OS X Mac, hence you will need to use a third-party Mac partition manager.
The steps mentioned above are the must and to-do steps while removing the Windows partition and also repartitioning the Mac. All the mentioned steps are much similar to the steps performed which you can do from Disk Utility.


0 comments: